Healthified Pancakes

I have been a pancake fan forever and I will take them any which way you give them to me.

Over the last few years though it has been a mini-mission of mine to pimp my pancakes so they pack a nutritional punch, while still being light and delicious. There have been numerous incarnations of healthier pancakes in my kitchen. But with this one I think I’ve have hit the jackpot. image

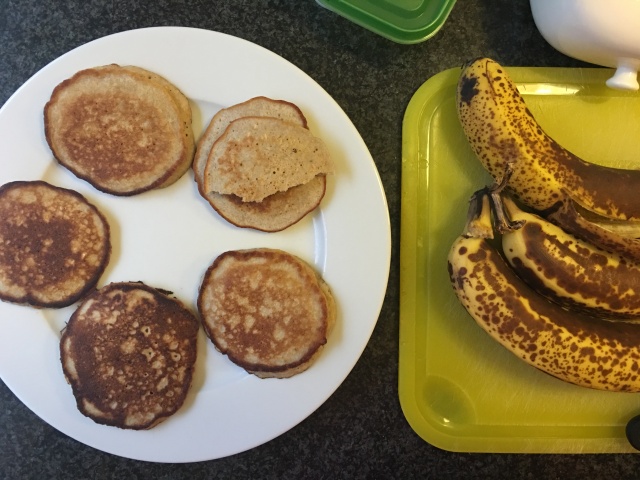
The only sweetner is banana so you can happily give them to little people, and they are easily made gluten free with the addition of gluten free posts. They come together quick smart and I can report that they were devoured by the G also (hence that half pancake on top).

imageimageimage

Perfect Healthified Pancakes (makes 6 smallish pancakes)

Ingredients 
1/4 cup oats
1/4 cup buckwheat flour
1/2 tsp baking powder
1 egg
1/2 banana
2(ish) tbsp milk (I used almond)
1 tsp vanilla

Method
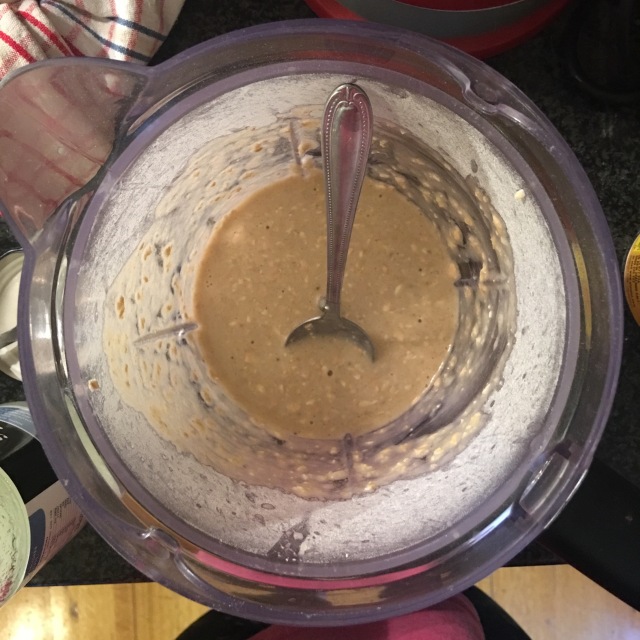
1. First up pop your dry ingredients (oats, buckwheat flour and baking powder) into your food processor and whiz them up so the oats break down a bit- they don’t have to be super fine.
2. Add everything else and whiz again.
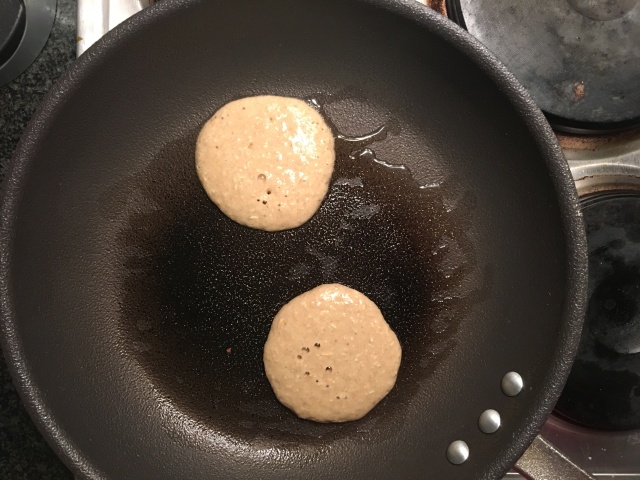
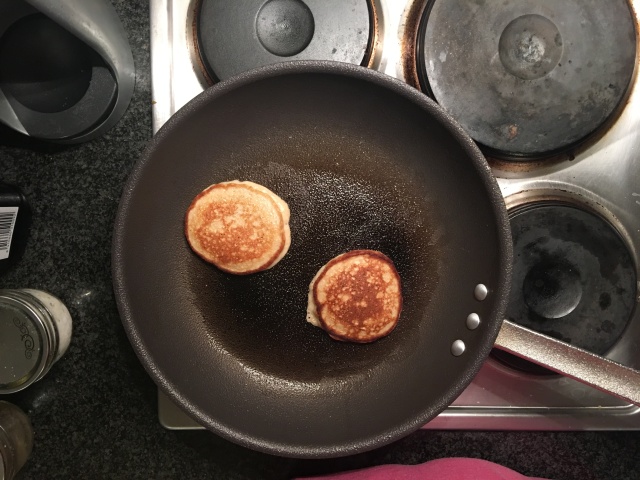
3. Heat your pan, add a little coconut oil (or another greasing agent) and cook 2 pancakes at a time. I could have got more but it makes flipping tricky.
4. You know the drill, when bubbles start popping on the surface of your pancake flip that sucker.

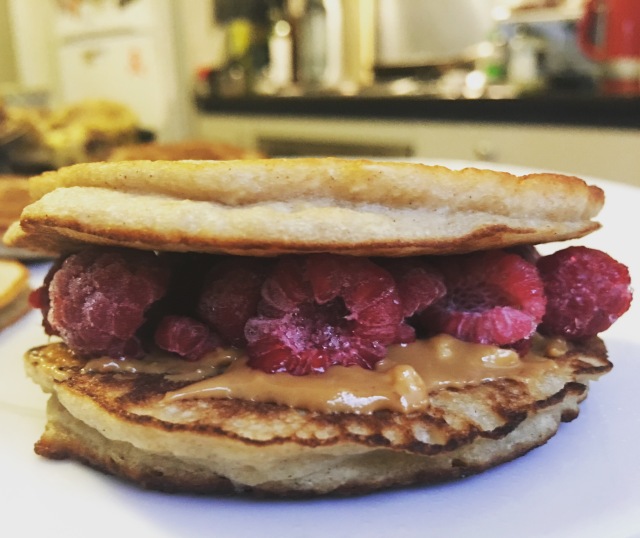
Now you can enjoy these babies however you choose, but it would be remiss of me not to mention how I ate mine… As peanut butter and raspberry sandwiches. Get. On. Board. You absolutely won’t regret it!

image

Lemon Pie Bites

Lemon Pie Bites
You know you’ve found a corker of a recipe when you regret not making a double batch before you’re even finished. This is exactly how I felt while whipping up Lola Berry’s Lemon Pie Bites from her 20/20 Diet Cookbook. I was inspired to head back to this trove of deliciousness in readiness for exploring her new one- The Happy Cookbook.

This recipe is SUPER easy. You’ll probably have most of the ingredients in your cupboard (and substitutions are simple as… pie) and they come together in about 20 minutes. Then you just have to resist them while they set up in the freezer.

Lemon Pie Bites
Lemon Pie Bites (adapted from Lola Berry)

Ingredients
75g (3/4 cup) whole raw almonds
75g (3/4 cup) raw walnuts
45g (1/2 cup) shredded unsweetened coconut
1 tbsp rice malt syrup (you could use honey or maple syrup too)
Juice of 3 lemons (mine were on the small side
Zest of 3 lemons (again mine were smallish, so if you’ve got bigger lemons adjust your zest… but in my opinion, the zestier the better!)
1 vanilla pod scraped
1/2 cup coconut butter
extra coconut for rolling

Method
1. Zest and juice your lemons, set aside
2. Add your almonds, walnuts and shredded coconut to a food processor, whizz it until your nuts are at a meal-ish consistency. It doesn’t matter if they’re a bit chunky.
3. Now in with all your other ingredients and blitz it baby!
4. Roll the mixture into balls and toss through the extra coconut
5. Pop them in the freezer for about 20 minutes to set
6. Enjoy! I store mine in the freezer for an icy treat

Lemon Pie Bites

And now to get my hands on a copy of The Happy Cookbook!


Anzac Biccies

I’m a few months late… I had intended on making these since before Anzac Day (celebrated in Australia and New Zealand on April 25) but just hadn’t gotten around to it until now.

Actually, that’s not entirely true…  I did attempt a gluten and refined sugar free anzac a month or so ago but it was not what you’d call a success what with me eating half of the mixture uncooked- thanks to the lack of eggs- and the other half congealing into one large biscuit while in the oven. Whoops.

This second attempt happened because on my “time out” afternoon one of my treats was a vegan anzac and hot-damn it was sensational. So much so that the following day I stocked up on ingredients and got to baking.

Anzac biscuits

I wasn’t so concerned with keeping these babies vegan, but still wanted to give them a gluten and refined sugar free twist.

This time around I also followed a recipe- always helpful. And I am please to announce that they were exactly what I was after! Just out of the oven they were crunchy on the edges and chewy in the middle. The following day they were super-chewy all over. As a result I may bake them for a little longer next time, because there will most definitely be a next time!

Anzac biscuits

I pretty much stuck to the recipe entirely, aside from subbing the macadamias for additional oats, so there is really no need to rehash it here, head on over to I Quit Sugar and get baking!

Oh and if you’re wondering… they go particularly well with Greek yoghurt and fresh juicy strawberries…

Anzac biscuits

Chocolate Bliss Balls

Growing this baby has made my sweet tooth ramp up to formerly unknown heights. After the whole liver thing 2 years ago (I cannot believe it’s been 2 years already!?) I cleaned up my diet a lot and pretty much cut out all refined sugar. I maintained it for quite some time, taking a break at Christmas (obviously), but for the most part I was a sugar free individual.

Then we went to Europe. And, well, what’s Europe without Italian Gelato and French pastries? Nothing, that’s what. So naturally I went on a sugar bender for roughly 6 weeks, and I do not regret a minute of it.

Once we got home though, my sweet tooth was tingling and taking myself back to a sugar-free place was challenging. But I tried. Once pregnant however, I found myself making exceptions, oh some chocolate here is ok, a little this and that won’t hurt. I am pregnant after all. And cravings are your body telling you what it needs!

I am pretty sure my body doesn’t need Crunch chocolate…

So, in an effort to tame my sweet tooth I decided I needed an alternative. Enter the Chocolate Bliss Ball. I’ve made a couple of batches but this latest one is definitely my favourite. Sweet, chewy, chocolatey and rolled in coconut. How can you lose?

raw chocolate balls

Chocolate Bliss Balls
(I adapted this recipe from another one that I can’t find now… when I do I’ll be sure post it)

Ingredients
1 cup sunflower seeds
1 cup roasted hazelnuts
12-15 medjool dates (depending how chevy you want them)
2-3 tbsp cacao
2-5 tbsp vanilla almond milk
Big pinch of salt
Desiccated coconut (for rolling)

Method
1. Blend your hazelnuts and sunflower seeds in a food processor until crumbly looking, you don’t want them to get to a paste stage
2. Add all you other ingredients and blend. Depending on how sticky and wet you want your mix you can add a little more milk here
3. Roll your balls and toss them around in coconut to coat
4. Place in the fridge or freezer to firm up

I store these babies in the freezer. They stay chewy and are sensational icy cold- I think that’s another preggo thing, really cold things.

Chocolate Bliss Balls

Anyway, a clean, vegan, refined sugar free treat that’s bursting with goodness and you don’t need to feel guilty about! But be warned… they are rather addictive!

Banana-Apple-Walnut loaf

Who doesn’t love banana bread?

But what do you do when you only have 1 over ripe banana? You scour your fridge for any other bakeable fruit, that’s what. And that’s how I ended up with this frankenstein bread-loaf creation.

I started with Teresa Cutter’s healthy banana bread recipe, but didn’t have everything I needed to got to making substitutions.

Banana-Apple-Walnut loaf

A little rice malt syrup here. A little melted butter there. Some grated apple instead of banana. And BOOM! You’ve got yourself a tasty and healthy snack.

Banana-Apple-Walnut loaf (based on Teresa Cutter’s Banana Bread)

Ingredients
1 ripe banana, mashed
2-3 large apples, grated (squeeze most of the juice out too)
3 eggs
200g almond meal
1/2tsp bi carb soda
1/2tsp apple cider vinegar
2 tbsp rice malt syrup
1tsp vanilla
1/4 cup chia seeds
1/4 cup melted butter
1/2-3/4 cup walnuts

Method
1. Preheat oven to 160*c
2. Combine banana, apple, eggs, vanilla, rice malt syrup, melted butter and apple cider vinegar
3. Add the almond meal, walnuts and chia seeds, mix it all up until combined
4. Spoon batter into a greased loaf tin
5. Bake for 45 minutes, test it with a skewer, if it comes out clean you’re done
6. Let it cool in the tin before removing
It should keep for about a week in an air tight container. You can also slice it up and freeze it in individual slices for a grab and go option.

Yum.

Cheesy Savoury Muffins (gluten free)

I’ve never really attempted a savoury muffin. I think it’s partly because I never know what to put in them. And also, as much as I can knock cupcakes out of the park, muffins always seems to allude me. It’s that whole “over mixing” situation. I always do it. However, when you take gluten out of the equation it seems to get a little easier.

savoury muffin

The reason I had an itch to make a savoury muffin was thanks to a spectacular one I enjoyed with a hot chocolate at the East Brunswick Project on a cold and rainy Saturday morning.

It didn’t take long to find a base recipe (this one) and took to tweaking.

savoury muffin

Cheesy Savoury Muffins (gluten free)

Ingredients
1 cup almond meal
1/2 cup gluten free flour
1tsp baking powder
3/4 cup milk
1 egg
60g butter (melted)
2 cups cheese (grated)
1/2 red onion (finely diced)
handful chopped parsley
salt and pepper

Method
1. Preheat over to 180*c (350*f), and line a 12 cup muffin pan
2. Combine almond meal, gluten free flour, baking powder, cheese, parsley and red onion, salt and pepper in a bowl
3. Mix up milk, melted butter and your egg
4. Add wet ingredients to dry and mix it up. Not too much!
5. Divide your mix up and bake for about 15 minutes
6. Enjoy!

savoury muffin

Banana protein muffins

I have a biology exam on Friday. This is the second time I have attempted the subject because last time the exam was on I was in Europe and holidays aren’t a good enough reason for deferrals… It wasn’t a bad thing, I think having to go over everything a second time was helpful.

Anyway, procrastination is a wonderful thing. Procrastination lead to these muffins. Well procrastination and 3 overripe bananas on my kitchen bench. I had actually been wanting to make a muffin for a little while now so this presented the perfect opportunity.

I knew that I wanted to make these grain free and protein packed, so after a little perusal of standard banana muffin recipes to get the proportions I headed to the kitchen. And the result wasn’t too shabby at all. banana protein muffinsbanana protein muffins

Banana protein muffins

Ingredients
3/4 cup almond meal
3/4 cup vanilla protein powder (I use Sun Warrior)
1 1/2 tsp baking soda
1/2 cup shredded coconut
1 cup walnuts
Pinch of salt
125gr coconut oil, melted
1/2tsp vanilla
1/3-1/2 cup almond milk
3 eggs, lightly whisked
3 bananas, mashed
1 1/2tsp apple cider vinegar

Method
1. Combine your dry ingredients, except walnuts
2. Make a well and throw in all your wet ingredients- except apple cider vinegar- mix it all up
3. Add your banana and walnuts, don’t mix it too much you want some banana chunks in there
4. Mix in your apple cider vinegar last
5. Spoon into a lined muffin tray
6. Bake at 180*c for 20-25 minutes
7. Allow to cool and try not to eat them all at once

banana protein muffinsEnjoy!

Gummies

The thought of making my own gummy lollies always struck me intimidating. Like so many things, once I actually attempted it, nothing could be further from the truth.

I first saw this recipe a couple of months ago on Balanced Bites and immediately wanted to try it. First I had to source the grass-fed gelatin the recipe called for (thank you GPA Wholefoods). It arrived reasonably swiftly and I was good to go. This and that pushed my gummy making to the side but with a free Saturday afternoon I decided it was time to make it happen.

With the AFL Grand Final on in the back ground- well done Hawthorn- I got to work. The recipe was simple enough, and I simplified it further… down to only 3 ingredients (4 if you include a splash of water).

First up you need a cup of berries (I used raspberries), fresh or frozen- defrost them if they’re frozen- and a cup of fresh squeezed lemon juice.IMG_5187Once the berries are defrosted they get whizzed up with the lemon juice and look like this. That’s the gelatin that is pretty much invisible in the bowl on the left. IMG_5193Add gelatin to berry-lemon mixture, it’s on a medium heat.IMG_5194Whisk. Whisk. Whisk. You want all the gelatin dissolved. you can see some lumps here still, they did disappeared. IMG_5196Once all your gelatin is dissolved pour your mixture into something to set, I used a cake tin (I have no idea why this photo looks anaemic, apologies). From here it’s into the fridge for about half an hour.

Do what you please for the next half an hour… And then… grab that tray out and marvel at how good you are. IMG_5195Because you just made gummy worms! Of course you don’t have to cut them into worms, they can be little chunks if you prefer, or any shape you please (you can bet I’ll be getting some cookie cutters involved next time).

These weren’t as flavoursome as I was hoping. Next time I might try a berry combo and add some zest to liven them up. Overall though I am very pleased with how these babies turned out. And not a grain of refined sugar in sight!

Raspberry and lemon gummy worms (adapted from Balanced Bites)

Ingredients:
1 cup berries fresh or defrosted from frozen
1 cup fresh squeezed lemon juice
5 tbsp grass-fed gelatin (the original recipe calls for 6, but apparently an Australian (metric) tbsp is 20ml as compared to a US one that is 15ml- don’t ask me why… it makes zero sense to me)
As mentioned next time I’ll be adding some zest too

Method:
1. Let your berries defrost if they’re frozen while you juice your lemons- I realised upon doing this that there is not a citrus juicer in my house, how is that possible? Doesn’t everyone have a citrus juicer? Not me evidently. One cup took about 8ish lemons, I still didn’t have quite enough so topped it up with a little water.
2. Put your berries and lemon juice into a blender or mini food processor thing, whatever you’ve got handy. Whizz it all up until you’re good and smooth with no obvious berry chunks left.
3. Pour your berry-lemon mix into a small saucepan over medium heat.
4. Add your gelatin and whisk, whisk, whisk. There will be lumps, but if you keep a-whiskin’ they’ll disappear eventually.
5. Once your gelatin has dissolved take it off the heat and pour into a ceramic dish or cake tin and stick it in the fridge for about 30 minutes.
6. It’ll be set but still a little jiggly, cut it however you please.

Chocolate Chip Cookies

There are few things in life as satisfying as pulling freshly baked chocolate chip cookies from the oven. The smell is enough to make me a little weak in the knees, and I  don’t even eat them anymore. IMG_2405I mean look at them… all golden with flecks of chocolate, just begging to be eaten before they are appropriately cooled.

Everyone has a go-to recipe for chocolate chip cookies. My go-to has evolved over the years to arrive at this fail safe, always incredible, mouth watering, concoction. IMG_2403Even the raw dough looks incredible. There have been times when I’ve bought those cookie dough rolls just to eat them raw… so good. IMG_2404They are perfectly bite sized at this stage. One mouthful. Gone. What raw cookie dough?IMG_2406But then you wait and that smell comes out of your oven! Good lord. What a smell.IMG_2407Then you box them up and take them all out of your house (much to the disppointment of the BF). They were highly appreciated in the wee hours of morning during Relay for Life, I am sure.

Chocolate chip cookies

Ingredients:
1 cup (235 grams) butter
2 cups plain flour
0.5 tsp baking soda
0.5 tsp baking powder
0.5 tsp salt
2 eggs
1 tsp vanilla
1 cup brown sugar
1 cup white sugar (I sometimes do half white, half raw if I feel inclined)
2.5 cups oat bran (I like mine a little bit chunky still, it gives the cookies a chewier texture)
200gr milk chocolate
140-200gr dark chocolate

Method:
1. pre-heat over to 180*c (350*f) and line some cookie trays with baking paper
2. combine flour, oat bran, salt, baking power and baking soda in a bowl, set aside
3. cream your butter and sugars until they are looking fluffy and glorious (you’ll know it when you see it)
4. add vanilla and eggs one at a time, beat baby, beat
5. add your flour mixture gradually until it’s all combined
6. roughly chop all of your chocolate, I use chocolate blocks rather than chips because it melts rather than holding its shape giving you these pockets of chocolate goodness… is anyone else drooling a little?
7. mix your chopped chocolate through your dough, get in there with your hands for even distribution
8. Roll dough into balls, I go with about a teaspoon of mixture, place them on your prepared tray a little way apart so it doesn’t become one big cookie (would that be so bad though, really?)
9. bake for 8-10 minutes, if you want them crispier leave them a little longer, I personally like them soft and chewy so 8-10 is perfection.
10. pull out of oven and try not to burn the roof of your mouth while stealing piping hot cookies off the tray,

Play with your food: Paleo banana bread

Banana bread is one of those things that pretty much everyone has a soft spot for. I am no exception. It’s sweet. It’s smells incredible. It’s so easy to eat I can inhale half of one in little more than five minutes (I’m guessing I could of course… I’ve not actually tried, recently). When I took gluten and sugar off the menu I thought my days of banana bread were over. I mean what is banana bread without its gluteny, sugary goodness? Turns out, banana bread is pretty amazing in all forms.

Over the past few months I’ve been doing some reading up on the Paelo diet and lifestyle. I really like the sound of it, although I’d find it difficult to forgo my natural greek yoghurt and cheese altogether. So when I found this recipe on Move Nourish Believe I had to give it a try.

With all of the ingredients on hand I got to baking… I just made a few tweaks:

1. Instead of honey I used rice malt syrup
2. All of my pumpkin and sunflower seeds ended up in the mix, so I sprinkled some cocoa nibs on top

IMG_1562Ready for the oven. I initially thought that a tablespoon of cinnamon was waaaay too much, the raw batter was super cinnamonny, and I am a fan of the stuff. However, after a some quality time inside the oven (longer than the recipe called for)…

IMG_1563The flavours mellowed and blended leaving me with a kick-ass banana bread, if I do say so myself. Perfect as a snack, slathered with butter, or make it breakfast with some yoghurt and fruit. Either way, it’s delicious!